2/11/16

Perfect Soft Sugar Cookies


So many posts have begun this way lately, but I honestly thought this recipe was already on here. It's my very favorite sugar cookie, and I've made it so many times that I just assumed that I had already shared it. If you are a fan of soft, cakey sugar cookies, my apologies for not sharing it sooner. For me, this is the soft sugar cookie recipe that I searched for years to find. I tried every kind of variation on sugar cookies and even some cake recipes, trying to find the perfect balance of buttery, sweet, soft, and cake-like. Once I tried this recipe, I immediately put six stars on the recipe page (out of a possible 5 stars) and wrote, "May I never use a different sugar cookie recipe again." A little dramatic? Perhaps. But you'll have to taste the cookies yourself to decide how much.


As I've said, these cookies are soft. If you are into the buttery, snap-in-your-mouth sugar cookies, these aren't for you. However, if you love those cakey cookies that are sold in your supermarket loaded with frosting, you've come to the right place. On their own, these cookies aren't overly sweet. In fact, that is one thing I love about them. They are perfect with just a dusting of sugar on top before baking. If you want to load on the frosting, though, these cookies are great for that, too. They are also fairly easy to make, without extra chilling steps or difficult-to-roll dough. They hold shape well when you cut them, and did I mention they were soft and delicious? May I never use a different sugar cookie recipe again.


Perfect Soft Sugar Cookies

Heat Oven To 350 Published 02/11/2016
Perfect Soft Sugar Cookies

Ingredients

  • 3 cups flour
  • 1 teaspoon baking powder
  • 1/2 teaspoon baking soda
  • 1/2 teaspoon salt
  • 8 tablespoons (1 stick) unsalted butter, softened
  • 3/4 cup sugar, divided
  • 1 large egg
  • 1/2 teaspoon vanilla extract
  • 1/2 cup buttermilk
  • Frosting (optional)

Instructions

  1. In a large bowl, whisk together flour, baking powder, baking soda and salt.
  2. In the bowl of a standing mixer or with an electric mixer, beat together butter and 1/2 cup sugar until fluffy. Add egg and vanilla and beat until incorporated. Add 1/2 of the flour mixture, beat until combined, and then 1/2 of the buttermilk, beating until combined. Repeat once with remaining flour mixture and buttermilk. Place dough on a piece of plastic wrap, flatten into a palm-sized circle and wrap plastic wrap around it. Refrigerate until cold, at least 2 hours. (Dough can stay in the fridge for up to 24 hours)
  3. Heat oven to 350 degrees. On a lightly floured surface, roll dough until 1/4 inch thick. Cut the dough into shapes of your choice and place them on a cookie sheet, spacing them at least 1 inch apart. Sprinkle cookies with remaining 1/4 cup sugar. Bake until cookies are just starting to brown, about 10-12 minutes. (I prefer them to be just barely brown. Check early if you are using a small cookie cutter.) Let the cookies cool on the baking sheet for a few minutes before transferring to a wire rack to cool completely. Decorate with frosting if desired.
Yield: 2 dozen cookies
Prep Time: 20 mins. (Plus 2 hours chilling time)
Cook time: 10 mins.
Total time: 1 hrs. 30 mins.
Recipe Source: America's Best Lost Recipes


12/19/15

Cranberry Fruit Bread


There are about 500 things on my to do list right now. I promised my husband that last year would be the last we'd travel for the holidays but being so far from family is hard and somehow I convinced him to do it again this year. For one final time. :) So, to add to the normal list of things-to-do around this time of year, such as bake treats and buy presents and see Christmas lights and so on, we're also searching the house for travel-sized shampoos, dusting off the luggage and making travel bags to help our preschooler and toddler be entertained during the 7 hour flight journey across the country. 

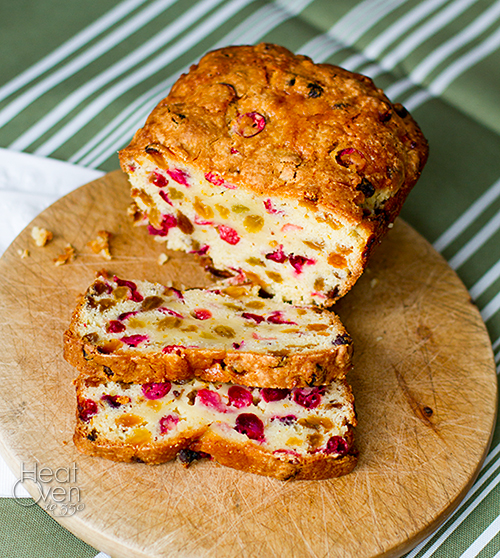
During all this, I'm taking a brief break to post this recipe because I've been wanting to post it for 5 whole years. And for some reason, things always get busy, and I don't post it, and another year goes by with me wishing I had it on here. This is one of my family's favorites that I grew up eating every year and it's really almost sacrilege that it has taken me so long to share it. One, because of it being said classic, and two, because it's the best cranberry bread out there, in my opinion. It's a buttery, rich bread that lets the perfect, bright, sour flavor of the cranberries shine. It's not overly sweet, but there is plenty of sweetness from the bread and the golden raisins to tame the cranberries and just give a wonderful balance of sweet and sour. It is a perfect Christmas time snack, a great bread to give as a gift, or even a wonderful addition to a Christmas brunch. Whatever the reason you find to bake it, make sure that you do. Enjoy, and have a merry Christmas!


Cranberry Fruit Bread

Heat Oven To 350 Published 12/19/2015
Cranberry Fruit Bread

Ingredients

  • 2 cups flour
  • 1 cup white sugar
  • 1 1/2 teaspoons baking powder
  • 1 teaspoon salt
  • 1/2 teaspoon baking soda
  • 1/4 cup butter
  • 1 egg
  • 1 teaspoon orange zest
  • 3/4 cup orange juice
  • 1 1/2 cups golden raisins
  • 1 1/2 cups chopped fresh cranberries

Instructions

  1. Heat oven to 350 degrees and grease a 9x5x3 inch loaf pan. (Or 3 mini loaf pans). In a large bowl, stir together flour, sugar, baking powder, salt and baking soda. Using two butter knives or a pastry blender, cut in butter until mixture is crumbly. Stir in egg, orange zest and orange juice just until mixture is evenly moist. Fold in raisins and cranberries.
  2. Spoon mixture into prepared loaf pans and bake for 1 hour 10 minutes (large loaf pan; 35-40 minutes for mini loaf pans) or until a toothpick inserted in the center comes out clean. Remove from pan and cool on a wire rack.
Yield: 1 large loaf (Or 3 small)
Prep Time: 00 hrs. 20 mins.
Cook time: 01 hrs. 10 mins.
Total time: 1 hrs. 30 mins.
Recipe Source: Cranberry Thanksgiving (a children's book)

11/4/15

Cauliflower Tots


The great Halloween detox has begun around our house. This mostly means I'm so sick of eating candy I'm hiding it on myself. I've eaten way more than either child this year. Blast those 100 Grands! My husband started making costumes for Halloween when Amelia was a baby, and this year the tradition continued. Our girls were Alice in Wonderland and the Cheshire Cat. My husband vastly overestimated how many hours are in a day and I may have spent most of the day before Halloween sewing purple and pink striped leggings and a tunic while my girls ran around the house like wild animals. It's always fun, though, to see them get so excited to dress up. 


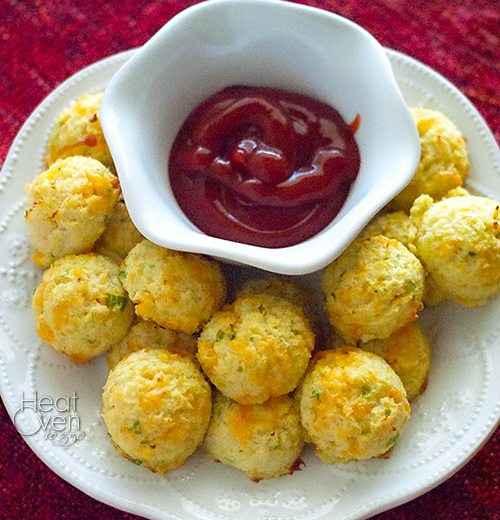
This is a recipe I've been wanting to post for months, so now is as good a time as any as we try to slowly get the sugar out of our system. We've been craving some "real" food at our house, and these cauliflower tots fit the bill nicely. First of all, my daughters love them. They have no idea that they are made with cauliflower, but they love that they are cheesy and dip nicely into ketchup. Second of all, I love them too. Cauliflower, being the ultimate diguisable vegetable, blends deliciously in these cheesy, crispy, oniony stand-ins for tater tots. I've made these for lunch for the kids maybe five times now, and every time I make them I tell myself I'll just eat leftovers and leave the tots for the girls but I always end up pulling out a plate for myself after stealing three or four off of theirs. They are a fun way to eat cauliflower and a healthier alternative to real tater tots. And a delicious way to get off the junk food train of this past weekend. 


Cauliflower Tots

Heat Oven To 350 Published 11/04/2015
Cauliflower Tots

Ingredients

  • 5-6 cups cauliflower florets (about 1 small-medium head)
  • 1/2 cup chopped green onion
  • 1/2 cup grated cheddar cheese
  • 1/2 cup dried breadcrumbs (I've used panko as a substitute but usually have to add about 1/4 cup more of the panko to thicken the mixture enough)
  • 3/4 teaspoon salt
  • pepper
  • 1 large egg
  • 1 egg white

Instructions

  1. Heat oven to 400 degrees and spray a cookie sheet with cooking spray. (Or use parchment paper or a silpat liner.) Add the cauliflower florets to a microwave safe bowl with 1/4 cup water. Cover and cook for 6-7 minutes or until florets are tender but not mushy. Drain water. (Alternatively, you can steam the florets in a saucepan with a little boiling water on the stovetop.)
  2. Add cooked florets to a food processor and pulse a few times until they are chopped finely. (If you don't have a food processor, chop them by hand.) You should get about 2 cups of cooked, chopped florets.
  3. Add the green onion, cheese, breadcrumbs and salt and pulse a few times until combined. Taste the mixture, add salt and pepper as needed, and then add the egg and egg white. Pulse again to mix.
  4. Using either your hands or a small cookie scoop, divide mixture into 1-2 T portions and place on prepared cookie sheet. (The mixture will be fairly loose. Just pack it together the best you can. The pieces will solidify more while baking.)
  5. Bake tots in oven for 16-18 minutes, or until they are golden brown and fragrant. Remove from oven and serve.
Yield: 4 servings
Prep Time: 20 mins.
Cook time: 18 mins.
Total time: 38 mins.
Recipe Source: adapted from skinnytaste.com

10/22/15

Swirled Yeast Bread


I've been wanting to post this recipe for years but somehow I could never get a good picture of it before it got eaten. And it deserves a proper pictures, wouldn't you say? I love the pretty swirls of the white and wheat dough. It's fun every time I slice into a new loaf to see how they turned out. While it is not the quickest homemade bread recipe I've made, it is the most impressive. It's a great bread to make to share with a new neighbor or bring to a potluck because it is so pretty, but it also tastes as good as it looks. Hence the lack of photos before now because it gets devoured so quickly. It's the perfect bread to bake up during these cool, autumn days. Enjoy!


Swirled Yeast Bread

Heat Oven To 350 Published 10/22/2015
Swirled Yeast Bread

Ingredients

Wheat Dough:
  • 2 cup all purpose flour
  • 2 1/2 tablespoons sugar
  • 1 package (1/4 ounce, 2 1/4 teaspoons) active dry yeast
  • 1 1/2 teaspoons salt
  • 1 1/2 cups warm milk
  • 3 tablespoons molasses
  • 2 1/2 tablespoons vegetable oil
  • 2 1/4 cups whole wheat flour
White Dough
  • 3 1/4 cup flour
  • 2 1/2 tablespoons sugar
  • 1 package (1/4 ounce, 2 1/4 teaspoons) active dry yeast
  • 1 1/2 teaspoons salt
  • 1 1/2 cups warm milk
  • 2 1/2 tablespoons vegetable oil

Instructions

  1. For Wheat Dough: In a large mixing bowl or the bowl of a standing mixer, combine the all purpose flour, sugar, yeast and salt. Add the milk and oil and beat until smooth. Add enough whole wheat flour to make a soft dough (dough will be sticky but will hold together). Knead 7-8 minutes, or until smooth and elastic. Place in a greased bowl and cover with saran wrap. Let rise until doubled, about 1- 1.5 hours.
  2. For White Dough: In a mixing bowl or bowl of a standing mixer (can be the same bowl you used for the first dough) add flour, sugar, yeast and salt. Stir in milk and oil and beat until smooth. And enough of remaining all purpose flour to make a soft dough. Knead 7-8 minutes or until smooth and elastic. Place dough in a greased bowl and cover with saran wrap. Let rise until doubled, about 1-1.5 hours.
  3. Punch down both doughs and divide in half. Roll one half of the wheat dough out on a lightly floured surface until it is about a 12x8 rectangle. Roll out half of the white dough to the same size. Carefully stack the rolled white dough rectangle over the wheat dough. Press all over the dough gently with the palm of your hand to seal the two doughs together. From the shorter end, start rolling the dough up like a jelly roll. When the dough is completely rolled, pinch the seam to seal it, tuck in the ends and place in a greased wide loaf pan. Repeat with the remaining dough to make two loaves total. Cover loosely with saran wrap and let rise until doubled, about 45 min.
  4. Heat oven to 375 degrees. Bake 45-55 minutes, or until browned and cooked through. Cool for 10 minutes in the pans before removing to cool completely on a wire rack.
Yield: 2 large loaves
Prep Time: 20 mins.
Cook time: 55 mins. (plus ~3 hours rising time)
Total time: 75 mins.
Recipe Source: adapted from Taste of Home

10/8/15

Pumpkin Oat Chocolate Chippers


Pumpkin can be such a divisive food. Every year when Fall rolls around, there are people who cheer its arrival as a sign that everything pumpkin flavored is on its way. Pumpkin cookies, cakes, drinks, candy and whatever else you can imagine floods our stores and our kitchens for months. 

This is not always a good thing for some people. Some people, my husband included, think pumpkin is not all that great, and the hype around pumpkin makes it even less appealing. My husband is in the minority at work in this opinion, and more than once he has come home and complained about the obsession people have with pumpkin flavored food. 

Know what all that talk about pumpkin makes me want to do?

You guessed it. It makes me want pumpkin flavored treats even more. Just as my husband was finishing up sharing his thoughts on the subject, I had narrowed down my list of 5 potential pumpkin recipes to make to just one, and before he could even groan in response, the kitchen was full of sweet smelling pumpkin oat cookies. Poor guy. 

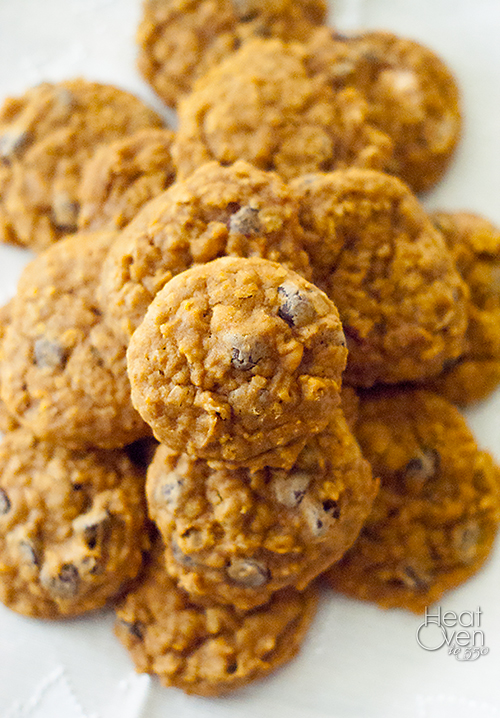
I know there are a many different pumpkin recipes to choose from, and deciding which ones to make each Fall ends up being a task for me. If you are having trouble choosing which pumpkin treat you would like to make this year, let me make it easier on you by telling you that these cookies are the ones you want to make. Soft, moist, just the right touches of spices, a little chew from the oats and the rich, delicious flavor of chocolate chips, these cookies are incredible. There is something about chocolate and pumpkin flavor that I love together. This recipe makes a giant batch and I feel like I could have finished off the entire batch if I were given too much time alone with it. It has quickly become one of my favorite fall cookies, and soon will be yours, too. 


Pumpkin Oat Chocolate Chippers

Heat Oven To 350 Published 10/08/2015
Pumpkin Oat Chocolate Chippers

Ingredients

  • 2 1/2 cups flour
  • 1 1/2 cup quick cooking (not instant) oats
  • 1 teaspoon baking soda
  • 3/4 teaspoon salt
  • 1 3/4 teaspoon ground cinnamon
  • 1/4 teaspoon ground nutmeg
  • 1/4 teaspoon ground ginger
  • 1 cup unsalted butter, softened
  • 1 1/3 cups pack light brown sugar
  • 2/3 cup granulated sugar
  • 1 large egg
  • 1 teaspoon vanilla extract
  • 1 1/4 cup canned pumpkin puree
  • 1 3/4 cup semi-sweet chocolate chips

Instructions

  1. Heat oven to 350 degrees. In a large mixing bowl or the bowl of a standing mixer, beat butter, brown sugar and granulated sugar until creamy, scraping down the sides as needed. With the mixer running, stir in the egg, vanilla extract and pumpkin puree.
  2. Add in the flour, oats, baking soda, salt, cinnamon, nutmeg, and ginger. Mix until well combined. Stir in the chocolate chips. Let batter rest 5-10 minutes for the oats to hydrate slightly to prevent runny cookies.
  3. Scoop dough into 1 1/2-2 tablespoon sized balls and drop onto cookie sheets, leaving 2 inches between dough balls. Bake 12-14 minutes, or until cookies are puffed and starting to brown. Cool on the baking sheets several minutes before transferring to a wire rack to cool completely.
Yield: 40-48 cookies
Prep Time: 00 hrs. 10 mins.
Cook time: 00 hrs. 45 mins.
Total time: 55 mins.
Recipe Source: Maceys.com

9/18/15

Ratatouille


I'm on a semi-regular blogging schedule. Which actually means, a very irregular, take-breaks-for-the-summer, blog-when-I-feel-like-it kind of schedule. When I do, however, get my lazy self to actually photograph a dish and type it up, you can bet it has entered into the "winner" section of my recipe collection and I may or may not be posting it simply so I don't have to keep finding the tomato-splattered, marked up recipe card that I wrote the recipe on. 

I found this ratatouille recipe this past winter when I was looking for veggie recipes to make for the kids. I made it on a whim because eggplant at the grocery store had been too beautiful to pass up and I can honestly say I was surprised how well it went over with my girls. The three year old loved helping me layer it all together and the then-ten-month old shoved it in her little mouth grinning the whole time. Then I took a bite myself and realized why they both loved it so much. The thin slices of vegetables get soft and sweeter during cooking, and combined with the garlicky tomato sauce surrounding them and the melted, salty Parmesan cheese on top, you have one tasty dish full of a variety of tastes and textures. I love that it is an easy way to get in a lot of vegetables and can be adapted to my family's vegetable tastes. 

If you've never cooked much with eggplant this is a great recipe to start with because it doesn't require salting to ensure that it isn't bitter. The ratatouille tastes delicious served over brown rice, couscous or quinoa, and although I have yet to try it, I'm betting it would be awesome scooped onto a nice crusty piece of French bread, too. Another bonus? I take the leftovers and blend them up with some water or chicken broth to a consistency I like, season it with salt and pepper to taste, and use it as a killer terrific pasta sauce. See why it's a "winner" in my recipe book? Grab up some of the year's final fresh garden produce and make some ratatouille with it!


Ratatouille


Heat Oven To 350 Published 09/18/2015
Ratatouille

Ingredients

  • 1 (6 ounce) can tomato paste
  • 1/2 cup chopped onion
  • 2 Tablespoons minced garlic
  • 1/4 cup olive oil, divided
  • 3/4 cup water
  • sat and pepper to taste
  • 1 medium eggplant, thinly sliced
  • 1 zucchini thinly sliced
  • 1 yellow squash, thinly sliced
  • 2 red bell peppers, cored and thinly sliced
  • 1/2 teaspoon dried thyme
  • 1/4 cup shredded Parmesan cheese

Instructions

  1. Heat oven to 375 degrees. In a 9x9 or similar sized baking dish, add the tomato paste, onions, garlic, 1 tablespoon olive oil, 1/4 teaspoon salt and the 3/4 cup water. Stir to combine.
  2. Alternate slices of eggplant, zucchini, yellow squash and red bell pepper over the tomato paste mixture and continue to arrange the slices starting at the outer edge of the dish and working toward the middle. Drizzle 3 tablespoons of olive oil over the top of the vegetables and sprinkle generously with kosher salt and ground pepper to taste. Sprinkle the thyme over the top, cover with foil and bake 40-45 minutes or until vegetables are tender. Top with Parmesan cheese, season to taste with salt and serve.
Yield: 4-6 servings
Prep Time: 15 mins.
Cook time: 20 mins.
Total time: 35 mins.
Recipe Source: adapted from allrecipes.com

9/12/15

Peach Chicken Rollups


I had to post another peach recipe while they were still in season because this recipe couldn't wait until next season rolls around. Its simple, yet amazing combination of flavors has made me crave it ever since I first tried it. I've made it for my family at least three times the last month and I plan on squeezing in one more time before the fresh peaches around here disappear. I'm not sure if it is the delicious sweet/sour pockets of peach flavor in these rollups, or the sweet, caramelized flavor of the onions that is my favorite thing about this dish. Or maybe it's the crispy tortilla shell wrapped around a cheesy chicken filling. It could also be the fact that it is easy and doesn't require the oven - still an important factor right now where I live. Whatever the reason, it's amazing, easy, delicious and worthy of the best peaches that late summer has to offer. 


Peach Chicken Rollups

Heat Oven To 350 Published 09/11/2015

Note: If you don't want to dirty two skillets for this dish, transfer the chicken mixture to a medium bowl before stirring in the cheese and carefully wipe the hot skillet clean before building your rollups and cooking them in it. You could wipe it clean after adding the cheese, too, but it will just be harder. With such a simple list of ingredients, make sure you use the best you can find for each one and don't shorten the onion cooking time. It really does make a difference to have the onions nice and soft for this dish.

Peach Chicken Rollups

Ingredients

  • 2 cups shredded cooked chicken breast (rotisserie chicken works great for this)
  • 1 medium onion, halved and thinly sliced
  • 1 tablespoon oil 1 tablespoons butter
  • 1 teaspoon kosher salt
  • 1 1/2 cups chopped, pitted fresh peaches
  • 1/8 teaspoon chipotle chile powder (optional)
  • 1 cup shredded cheddar cheese
  • 6 flour tortillas

Instructions

  1. Heat the 1 tablespoon of oil and butter in a 12 inch skillet over medium low heat. Add onions and salt and cook, stirring frequently, until the onions are soft and starting to caramelize, about 15 minutes.
  2. Add the shredded chicken to the onions along with the peaches and chipotle chile powder. Cook the mixture, stirring occasionally, until warmed, about 5 minutes. remove from heat and stir in cheddar cheese.
  3. Heat another large nonstick skillet over medium heat. Add about 1/4 cup of the chicken mixture down the center of a flour tortilla. Fold the sides over the chicken mixture and press lightly to flatten. Place seam side down in skillet to cook, flipping after one side browns. Repeat with remaining tortillas and chicken mixture. Serve immediately.
Yield: 4-6 servings
Prep Time: 10 mins.
Cook time: 25 mins.
Total time: 35 mins.
Recipe Source: Adapted from sugardishme.com

 
Pin It button on image hover